
Introduction
To access the tool, select the objects you want to rename (this includes scene objects and assets from the project browser) and use the Edit › Rename menu entry or the shortcut CTRL F2 on Windows or ALT CMD R if you‘re on a Mac.
To customize the shortcut, or if another tool already uses the default combination, please open the settings through the Unity Preferences › BulkRename. You will be prompted with the custom shortcut / hotkey options. Any changes need to be saved as this updates and recompiles a script with the modified keystroke. If the shortcut is not working, it may be occupied by your operating system or Unity itself, in that case please try a different combination.
The Rename Window
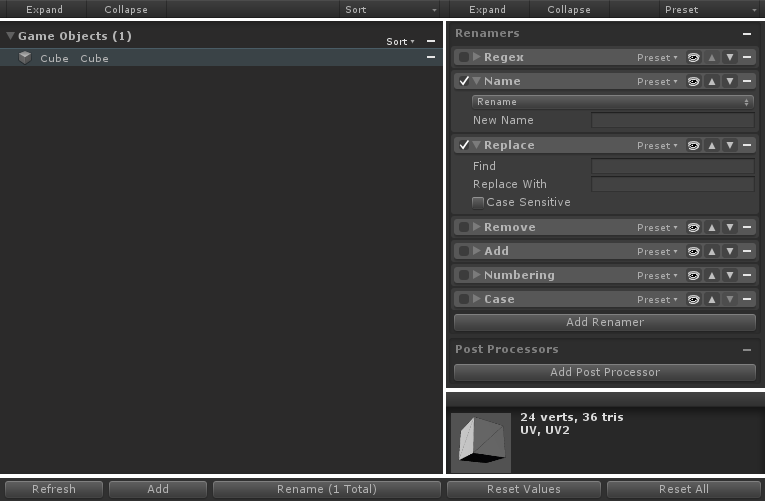
The tool is divided into three main sections: the selection table, rename options and an asset preview. Above and below you will find a tool and an action bar.
Top Toolbar
In addition to buttons to expand or collapse all sections within each view, you will find a dropdown with actions. For the rename table this is a global Sort, for the sidebar this is for saving and applying Presets.
Bottom Actionbar
The Refresh button updates your selection. Use Add if you want to keep the window open while adding to your selection. To reset the options, use Value to only reset your settings or All to reset all renamers. If you’re happy, hit the Rename button to apply your changes.
Selection Table
The selection table is divided into different categories that depend on what your selection contains. Each entry has a small icon preview that shows its content (textures show their real image), followed by their original name and a preview of their future name after confirmation of the rename process.
A click on the minus sign deletes an entry (or a whole category) that should not be renamed. However, bringing back a selection (if you clicked on it by accident), is only possible by a full selection refresh (see above) - there's no undo.
Left clicking on an entry will select it and show a small asset preview, listing both the path to the asset and labels (if any). This is not applicable to GameObjects. A right click on an entry will ping the object in the editor in case you would like to know where it came from.
You can also navigate around the table using your arrow keys (UP and DOWN). To delete an entry you can use either DELETE or BACKSPACE.
It is also possible to sort the list in a natural, alphanumeric fashion (both ascending and descending) and either based on the original or new name. GameObjects can also be sorted by their Scene Hierarchy Order.
Rename Options
In addition to being able to toggle a renamer to skip its execution, you can also click the eye icon to see the rename process up to that point (useful for when you want to pin down some errors in the process). The up and down arrow keys allow you to rearrange the stack. Just like in the selection view, a click on the minus button removes the renamer. When clicking the minus sign right next to the Renamers title, it will clear the whole stack instead.
Most of the renamers are widely known and straightforward, with advanced options included.
- Add gives you the option to add a prefix and/or suffix, with an optional separator.
- Case allows you to change the casing of your words between lower/UPPERCASE or Capitalization.
- Name either allows you to define a completely new name for the object (e.g. name all Cubes Boxes) or to simply reverse the whole name of the object.
- Numbering: Allows you to add an enumerated text to the name. There are two modes: alphabetical
and numerical.
- Alphabetical takes either a single character or a whole line of text (for an example see the Spreadsheet Columns preset included in the package).
- Numerical is a typical increasing of numbers. You can also pad them to fill the rest in with zeroes (e.g. "001" to "123").
- Regex: This is probably the most powerful in terms of flexibility as it uses the common pattern-replacement technique. We provide you with pattern Presets (that we personally found useful) to give you a head start. To learn more about regular expressions, please visit the following link for more information: https://regexone.com/.
- Remove: To remove certain characters from the names, this option lets you choose from three types that will be stripped: digits, characters and special characters. The latter basically removes everything that is not of the two former (e.g. House+Pool (2) becomes HousePool2).
- Replace: Easy alternative to do simple string replacement as compared to the Regex option
Post-Processors 2
After a successful rename operation, post-processors can run additional actions, that might help you in your everyday workflow.
Clipboard Processor
This tool automatically copies generated code to your clipboard after renaming your objects.
Even though you should rarely need it, this comes in very handy if you tend to use GameObject.Find.
Presets 2
Version 2 introduced a new ScriptableObject-based Preset system. It is now possible to not just create presets for the whole stack, but also for individual renamers and post-processors.
As this system leverages internal Unity APIs, you can easily add your presets to your project's VCS (like Git, Perforce or Unity Collaborate) and improve the workflow for your whole team.
Presets can also be created from inside your Project window using the Create › BulkRename submenu. Therein you will find an item for every renamer and post-processor.
Quick Rename 2
If you have saved your rename options as a preset, you can easily apply it to your selection by using the Edit › Quick Rename menu. This will open up a single preset picking dialog that auto-applies your settings on either a double click or pressing enter.
Developer API 2
In case you are missing a rename action, or a post-processor, our API can be leveraged to extend BulkRename. Simply have a look at the following three classes and our own implementations:
Dyonity.BulkRename.Extension
Base class for all extensions. Has properties and methods for its name, and UI rendering.Dyonity.BulkRename.Renamers.Renamer
Use this if you want to create custom renamers and implement theProcessString()method.Dyonity.BulkRename.Processors.Processor
Parent for all processors. Implement theProcess()method to walk over a list of objects you want to run your actions on.